How Swagger and NestJS Improve API Documentation
Table of Contents
How Swagger and NestJS Improve API Documentation
Every software creator knows the importance of documentation, especially when collaboration is at the heart of development. As a backend developer, you might have experienced the struggle of creating comprehensive and user-friendly API documentation. It’s a task often deemed repetitive and dull, but for frontend developers, it’s the lifeline to understand and integrate your work seamlessly.
Working in both roles, I felt both the boredom of documenting and the pain of having to work with not clear APIs.
Luckily enough, there are already proved and battle-tested ways to document your work and let other benefits from it, and you’re so close to achieve it. Yet, so many developers put too little effort in walking this extra mile.
Unveiling Swagger: A Modern Tool for API Documentation
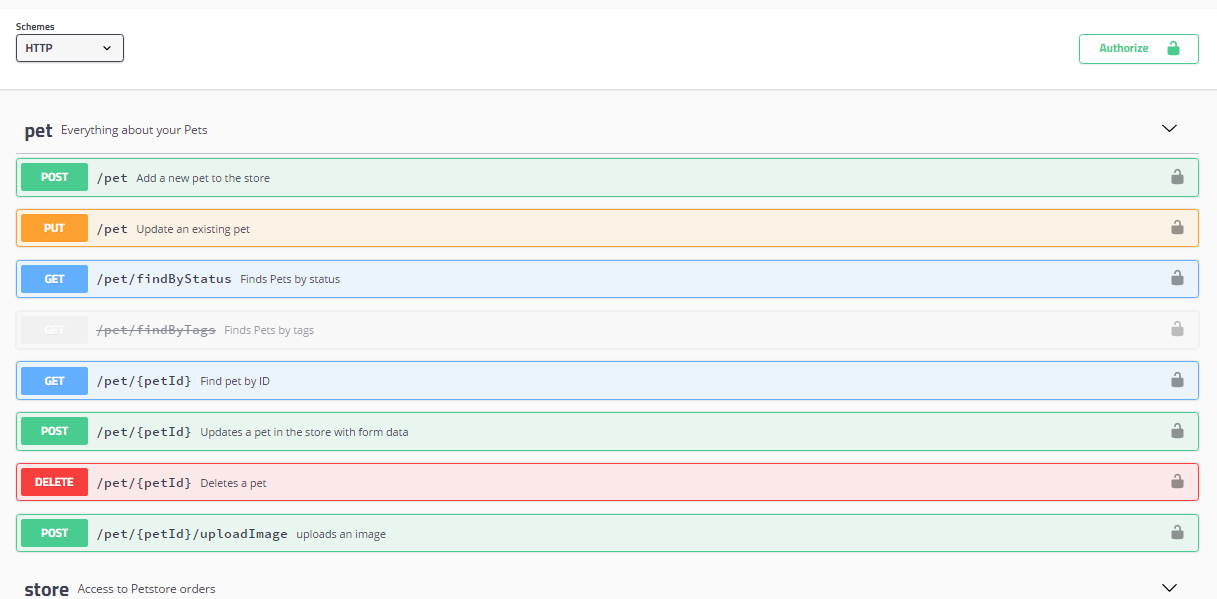
Typical Swagger interface for a set of endpoints
Swagger is the de-facto way to create an easy access to others to your work. Now known as OpenAPI Specification (OAS), Swagger is an very convenient tool in modern software development for documenting and visualizing RESTful APIs.
It provides a standardized and machine-readable format to define API endpoints, request/response data structures, authentication methods, and other relevant details.
The API you create are available trough a simple HTML page that displays all the information you may need. But only if the developer was kind enough to provide them.
An incredibly messy start
In order to fully understand the benefits, we first must feel the despair. We need to look at the “documentation” of an API and be genuinely frustrated at how hard is it to consume. For our go-to application we chose NestJS as framework and walk through the development step-by-step.
After initializing our project with
nest new library-server
we are ready to create some Resources. To those not familiar with NestJS, resources can be viewed as collection of Controller-Service-Entity in a project, divided each in their own file.
The goal of this project is to have a library that contains books which have some intuitive attributes.
In order to create a full CRUD resource we can run the following command:
nest g resource
After answering the prompted questions, this will create for us the book.controller.ts , the book.service.ts and book.entity.ts . For our book entity let’s say we are going to have the following attributes
export class Book {
  "book_id": string;

  "title": string;

  "isbn": string;

  "genre": string;

  "price": number;
}
and then we are going to scaffold the service and the controller like follows
import { Injectable } from "@nestjs/common";
import { Book } from "./entities/book.entity";

const books = [] as Book[];

@Injectable()
export class BooksService {
  create(book: any) {
    books.push(book);
    return book;
  }

  findAll(query: { title: string; page: number; limit: number }) {
    const { title, page, limit } = query;
    const p = page || 1;
    const l = limit || 10;
    const booksContainingTitle = books.filter((book) =>
      book.title.includes(title),
    );
    const results = booksContainingTitle.slice((p - 1) * l, p * l);
    return {
      data: results,
      total: booksContainingTitle.length,
      page: p,
      limit: l,
    };
  }

  update(id: string, book: any) {
    const bookIndex = books.findIndex((book) => book.book_id === id);
    books[bookIndex] = book;
    return book;
  }

  remove(id: string) {
    const bookIndex = books.findIndex((book) => book.book_id === id);
    books.splice(bookIndex, 1);
    return `Book with id ${id} has been removed`;
  }
}
As you may notice, we added a little bit of logic to our findAll method in order to enable some basic pagination and filtering
import {
  Controller,
  Get,
  Post,
  Body,
  Patch,
  Param,
  Delete,
  Query,
} from "@nestjs/common";
import { BooksService } from "./books.service";

@Controller("books")
export class BooksController {
  constructor(private readonly booksService: BooksService) {}

  @Post()
  create(@Body() book: any) {
    return this.booksService.create(book);
  }

  @Get()
  findAll(
    @Query() title: string,
    @Query() page: number,
    @Query() limit: number,
  ) {
    return this.booksService.findAll({
      title,
      page,
      limit,
    });
  }

  @Patch(":id")
  update(@Param("id") id: string, @Body() book: any) {
    return this.booksService.update(id, book);
  }

  @Delete(":id")
  remove(@Param("id") id: string) {
    return this.booksService.remove(id);
  }
}
Now we need to add Swagger in order to expose the information about the books API. We install the additional package with
pnpm install --save @nestjs/swagger
and update the code of our main.ts file in order to expose the automatically generated documentation
import { NestFactory } from "@nestjs/core";
import { AppModule } from "./app.module";
import { DocumentBuilder, SwaggerModule } from "@nestjs/swagger";

async function bootstrap() {
  const app = await NestFactory.create(AppModule);

  const config = new DocumentBuilder()
    .setTitle("Books library")
    .setDescription("The books API description")
    .setVersion("1.0")
    .build();
  const document = SwaggerModule.createDocument(app, config);
  SwaggerModule.setup("api", app, document);

  await app.listen(3033);
}
bootstrap();
Now after running our application we can finally see the Swagger static page with all the endpoints.
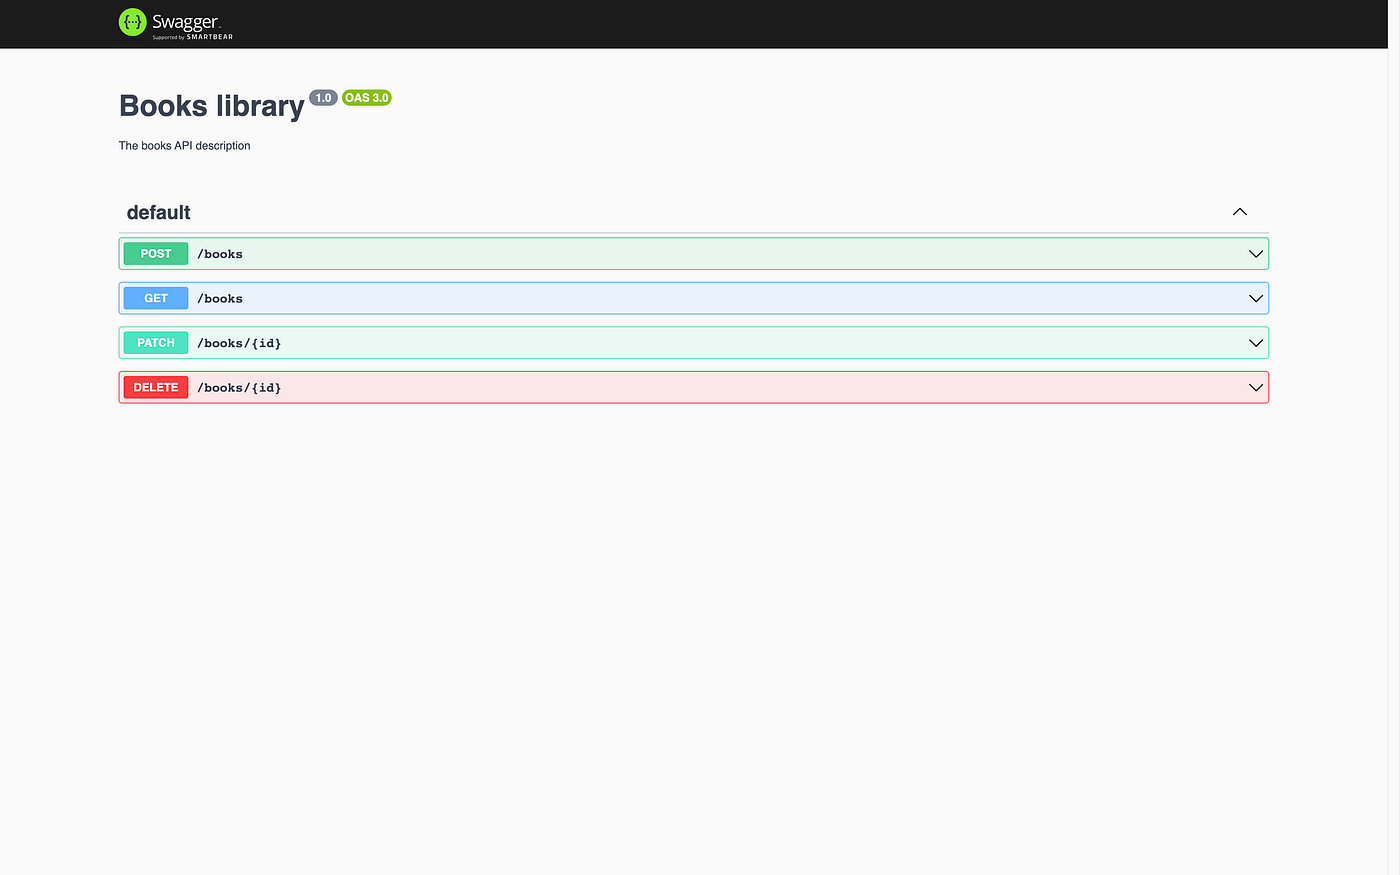
Good job! Now we are absolutely positive that the frontend developer that works on that will hate us! 😃
Cleaning up the mess
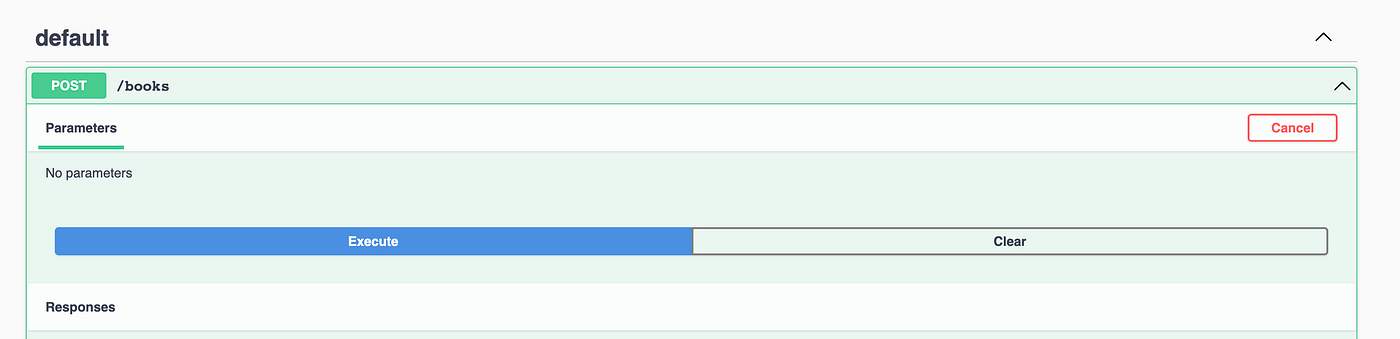
First, let’s see what’s wrong with what we have just done:
- The POST method cannot even be tested, and gives no information about the structure of what we should provide to create a new
bookobject
- The GET method is not exposing the 3 query parameters that were created and is not providing the type of
datain the response
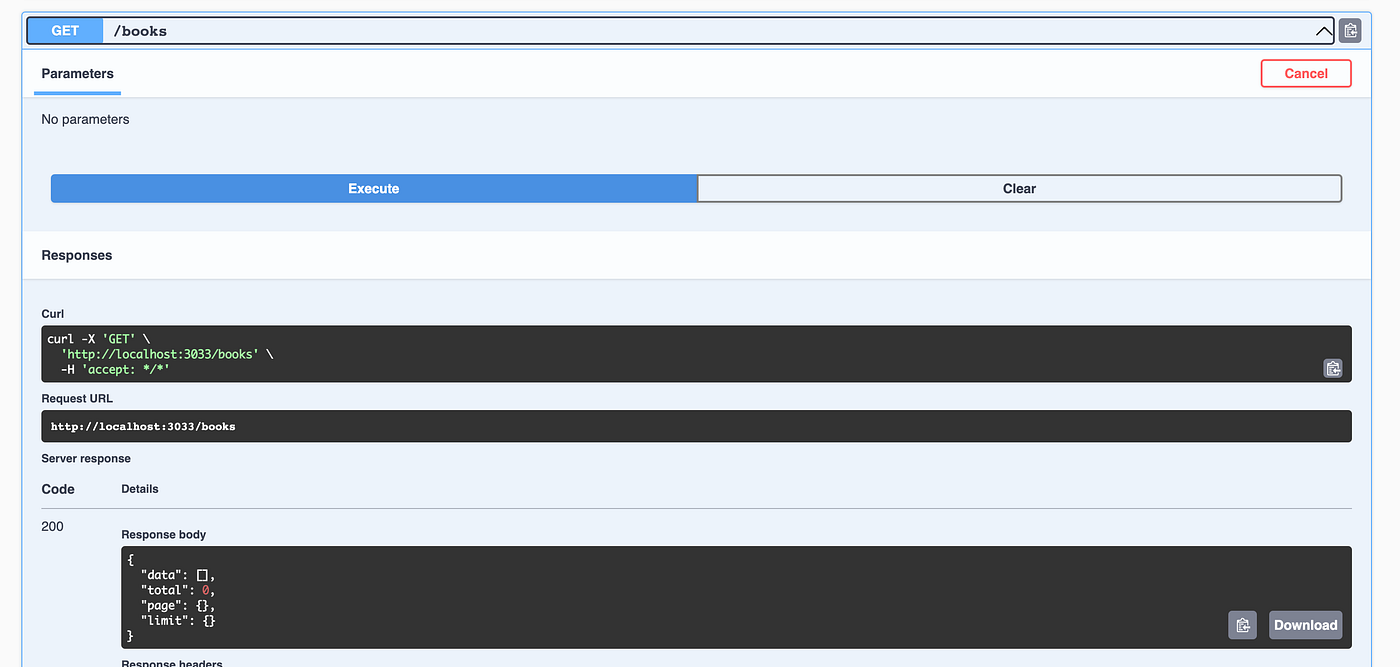
- What’s even the structure of those books?
- The PATCH method is actually replacing the book in our “database” and not updating its attributes. This could be a ( very debatable ) decision of the backend engineer that is completely missing from the documentation.
Data structure
We need to make sure that who is going to consume our API knows the data structure that we decided to adopt for our objects. This is not only related to Swagger like in this instance, but to any kind of documentation we want to provide.
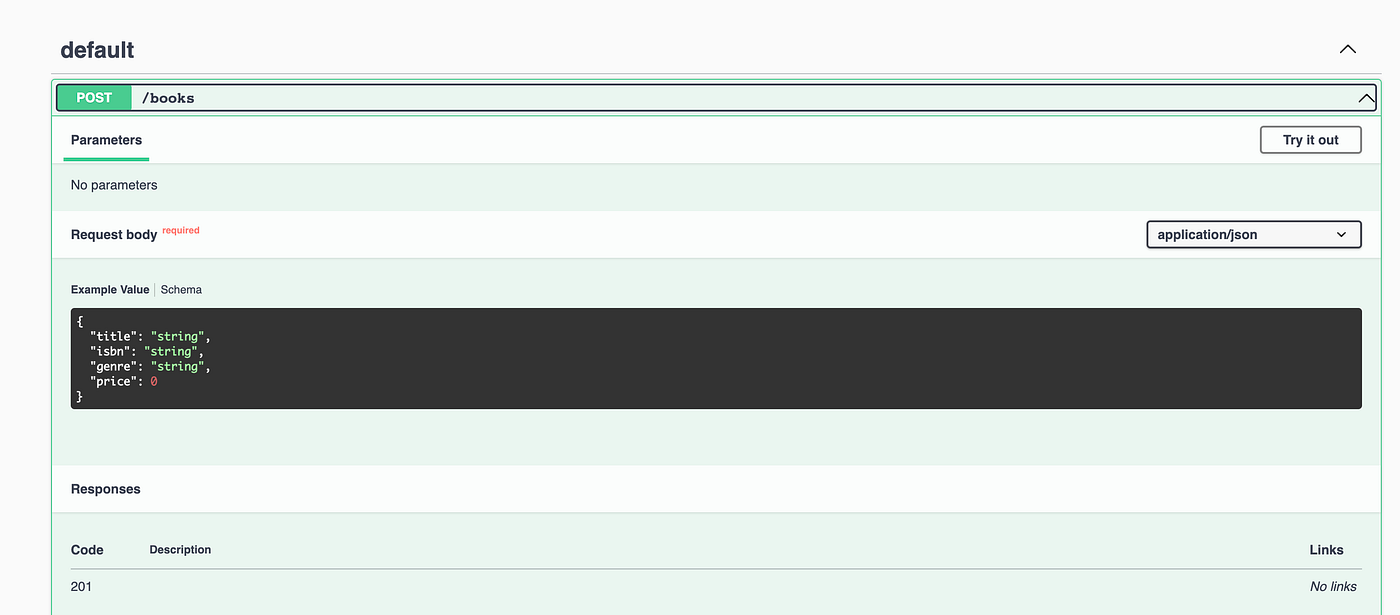
If we just update the POST controller by specifying the type of the body, we can see that our Swagger page got updated

But the book definition is now empty. In order to fill it we have to also update the attributes of the original Book class with the @ApiProperty() decorator. Still, most of the time what I actually see in the wild is the following usage
import { ApiProperty } from "@nestjs/swagger";

export class Book {
  @ApiProperty()
  "book_id": string;

  @ApiProperty()
  "title": string;

  @ApiProperty()
  "isbn": string;

  @ApiProperty()
  "genre": string;

  @ApiProperty()
  "price": number;
}
That’s so close to be perfect.. let’s just make the extra effort to add some more information
import { ApiProperty } from "@nestjs/swagger";

export class Book {
  @ApiProperty({
    description: "The title of the book",
    type: String,
    example: "The Lord of the Rings",
  })
  "title": string;

  @ApiProperty({
    description: "The ISBN of the book",
    type: String,
    example: "978-0544003415",
  })
  "isbn": string;

  @ApiProperty({
    description: "The author of the book",
    type: String,
    example: "J.R.R. Tolkien",
  })
  "genre": string;

  @ApiProperty({
    description: "The price of the book",
    type: Number,
    example: 10.99,
  })
  "price": number;
}
This will create the following schema in the documentation:
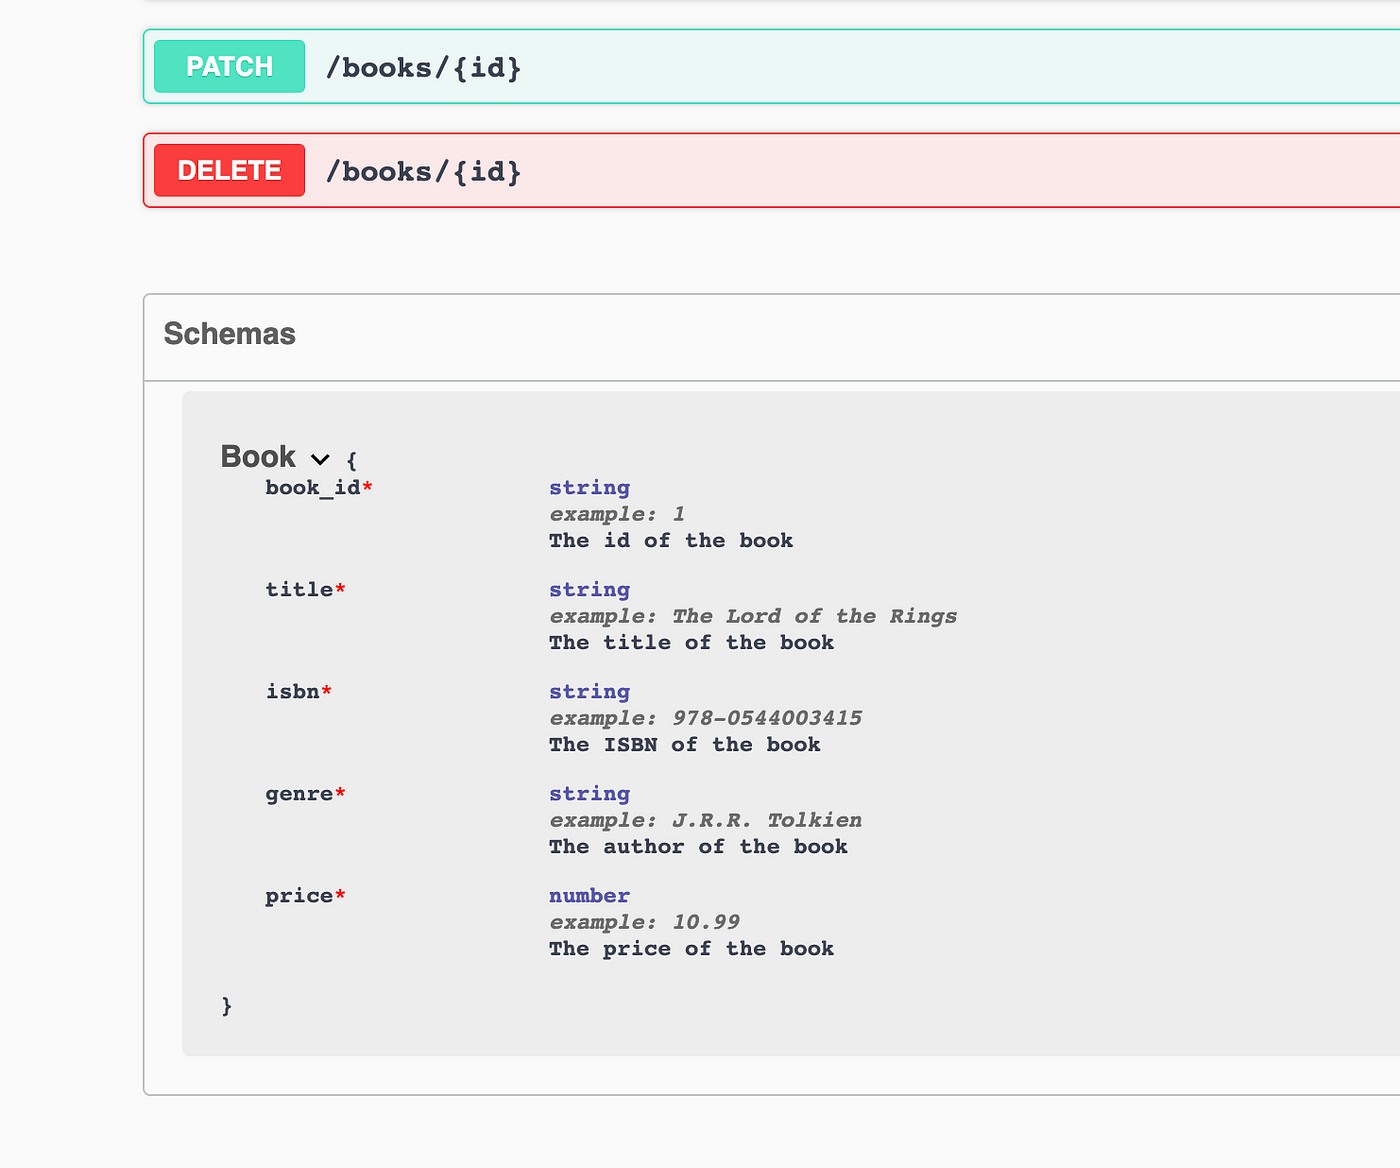
Much better!
OpenAPI
Since under the hood we are using the OpenAPI standard to showcase our REST API, let’s quickly check what is the JSON format and how the schema is being saved in our documentation
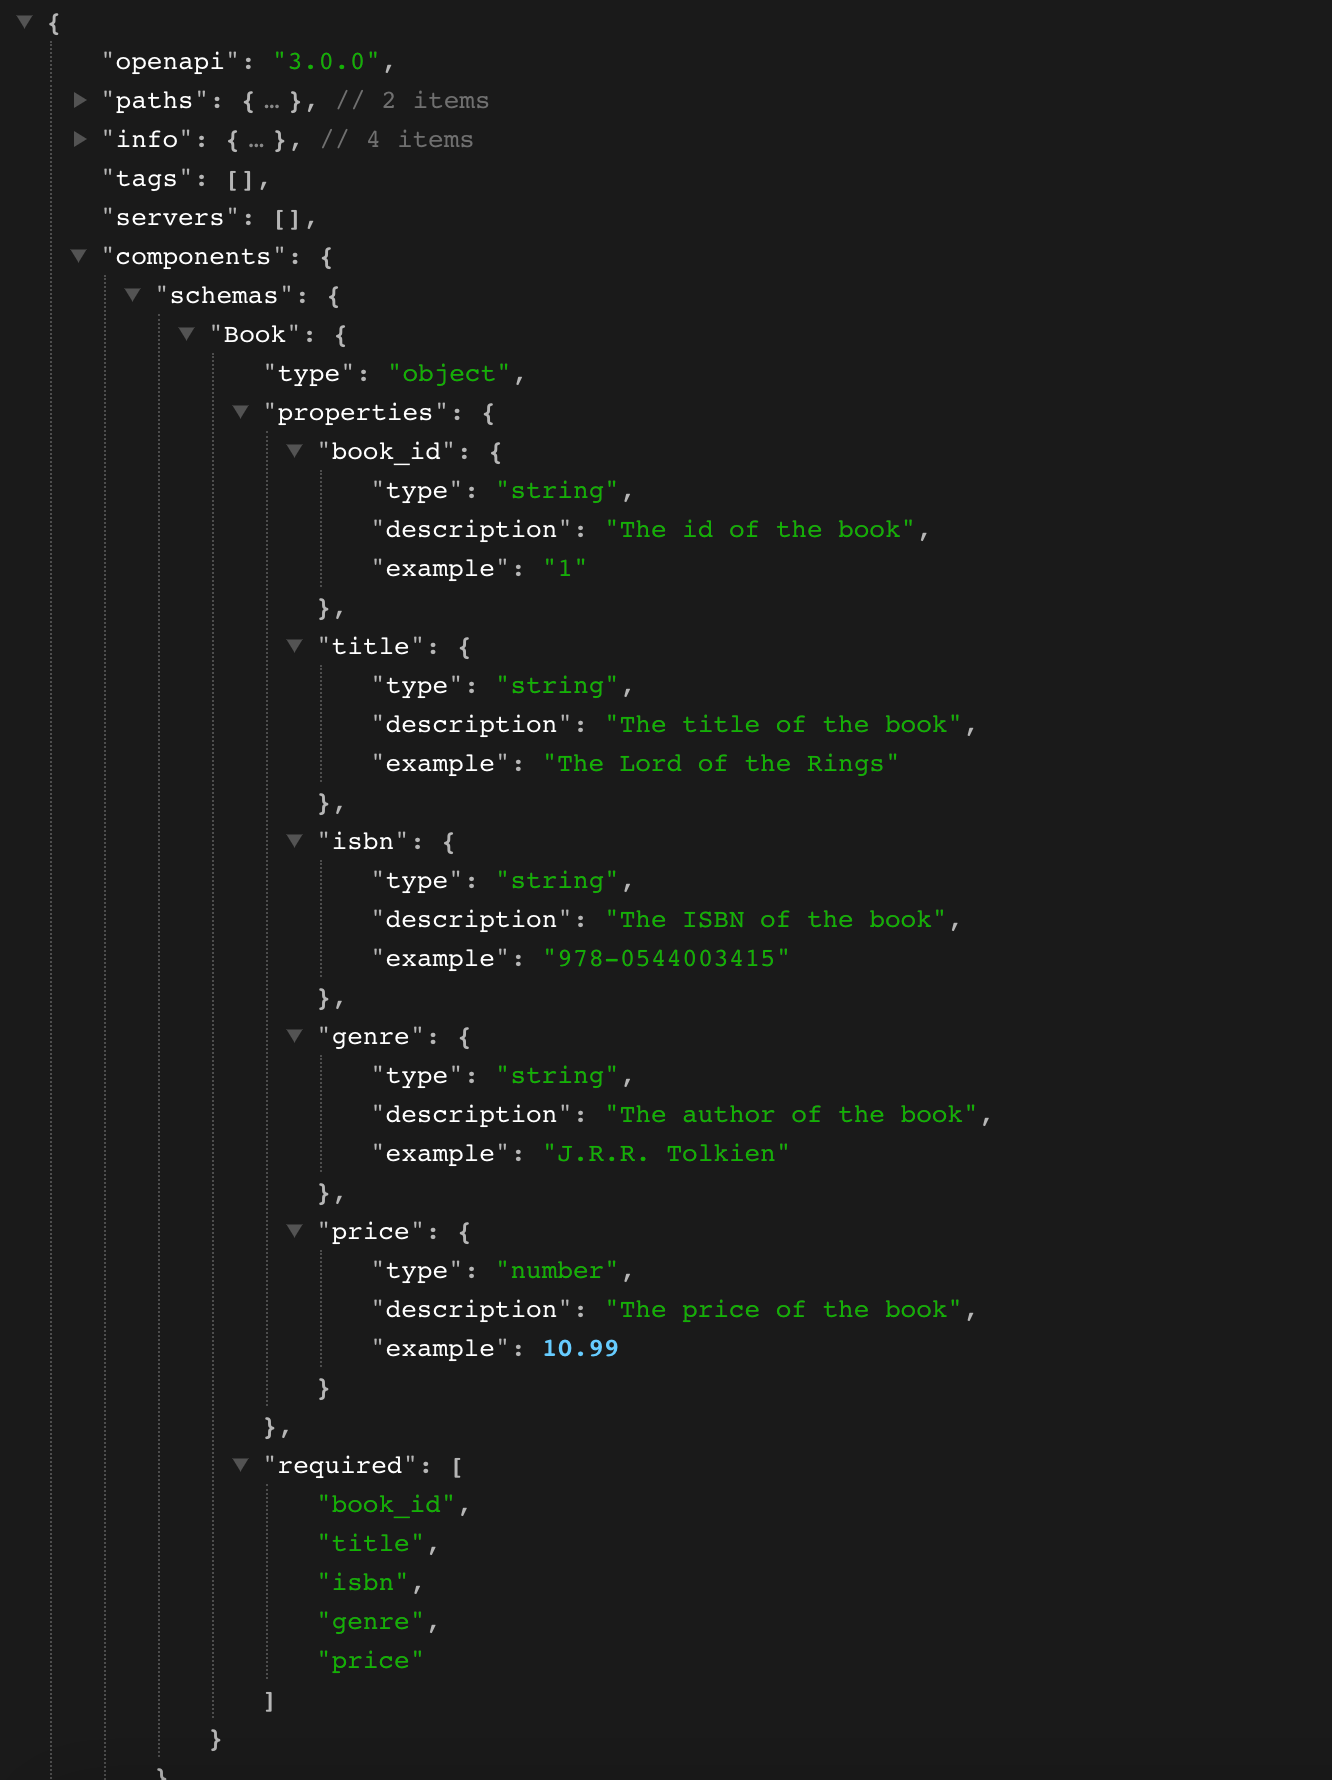
This can be useful to know if you are not using tools that automatically generate the OpenAPI spec file.
DTOs
When you create an object, typically you will not have already all the data that are required from your database. The book_id for example, should be either generated by the server or the database itself, and we want to make sure that who is calling our creation API is not passing it.
DTO stands for “Data Transfer Object.” It is a design pattern used in software development to encapsulate and transport data between different layers or components of an application. DTOs are simple, lightweight objects that typically contain only data and have no behavior or business logic.
We are going to modify our controller to make use of DTO, which are going to contain only the fields required for creation. The controller will then be like
  @Post()
  create(@Body() book: CreateBookDto) {
    return this.booksService.create(book);
  }
and the DTO class will be modified as follows
export class CreateBookDto {
  "title": string;
  "isbn": string;
  "genre": string;
  "price": number;
}
By introducing the class validation (with the class-validator package) we can enrich our definition in the following way
import { IsNotEmpty, IsNumber, IsString } from "class-validator";

export class CreateBookDto {
  @IsString({
    message: "Title must be a string",
  })
  @IsNotEmpty({
    message: "Title must not be empty",
  })
  "title": string;

  @IsString({
    message: "ISBN must be a string",
  })
  @IsNotEmpty({
    message: "ISBN must not be empty",
  })
  "isbn": string;

  @IsString({
    message: "Genre must be a string",
  })
  @IsNotEmpty({
    message: "Genre must not be empty",
  })
  "genre": string;

  @IsNumber({
    allowInfinity: false,
    allowNaN: false,
    maxDecimalPlaces: 2,
  })
  "price": number;
}
and now we have a much clearer way to understand what to pass to the creation method to create a new book!
Filtering with queries
So far, if we wanted to query some of the available books we had no idea of what parameters are available. Let’s add some clarity with some extra information on the controller side:
@Get()
@ApiQuery({
	name: 'title',
	description: 'Search by title',
	required: false,
	type: String,
})
@ApiQuery({
	name: 'page',
	description: 'Page number. Starts from 1',
	required: false,
	type: Number,
})
@ApiQuery({
	name: 'limit',
	description: 'Number of items per page. Default is 10',
	required: false,
	type: Number,
})
findAll(@Query() title: string, @Query() page: number, @Query() limit: number) {
	return this.booksService.findAll({
	  title,
	  page,
	  limit,
	});
}
By simply adding the @ApiQuery() decorator we can now have the following extra properties in our endpoint definition
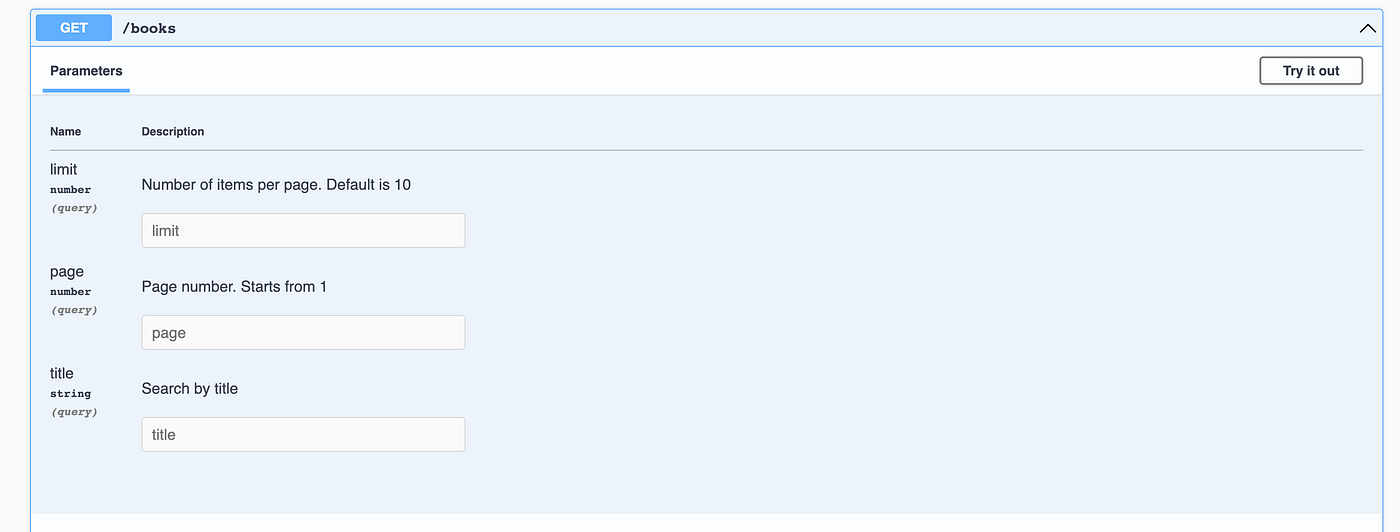
Waaay better!
Description and return types
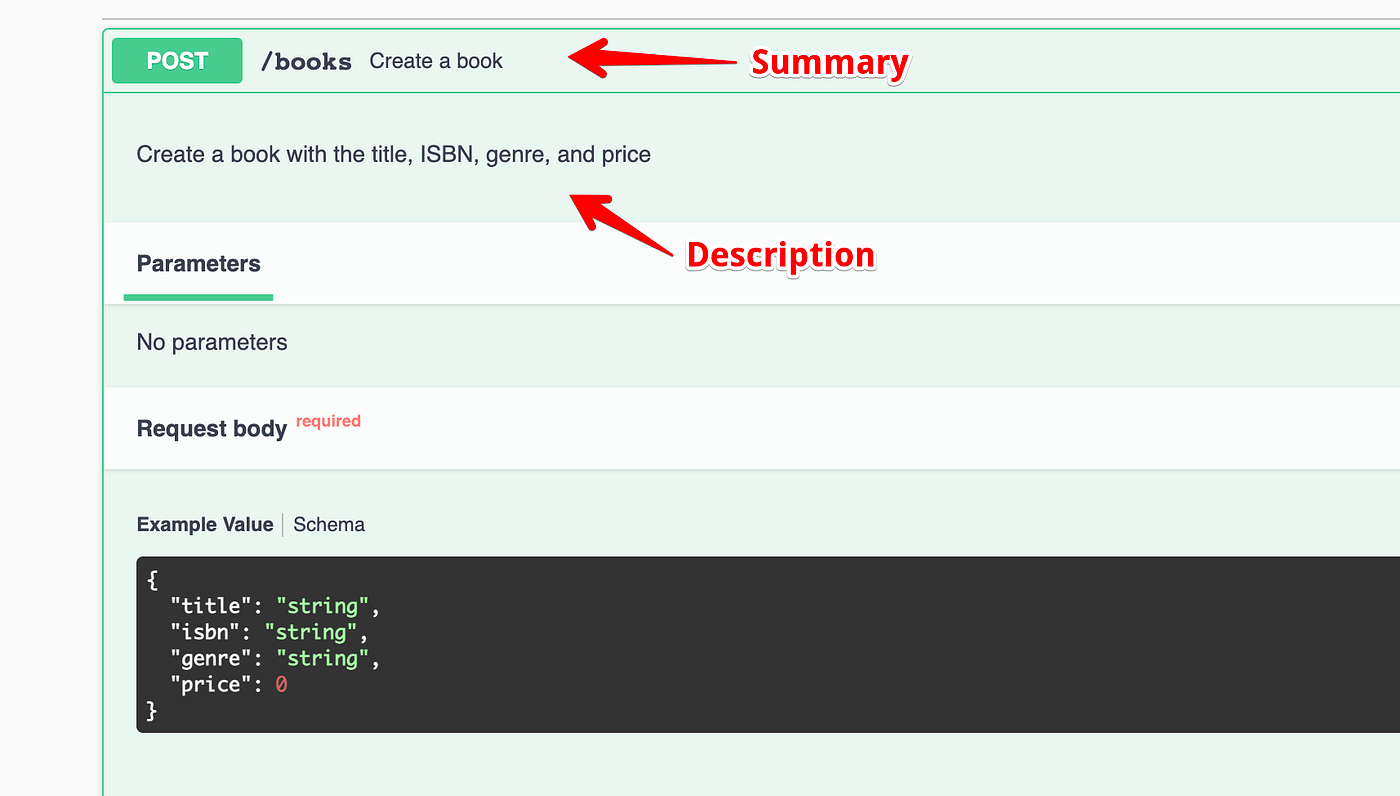
Let’s wrap it up with the methods by adding the summary and description of the API as well as the return type. This will help with handling types on the side of whoever is consuming the API.
By adding the @ApiOperation() decorator we can use the description and summary fields to better define the scope of our endpoint
  @Post()
  @ApiOperation({
    summary: 'Create a book',
    description: 'Create a book with the title, ISBN, genre, and price',
  })
  create(@Body() book: CreateBookDto) {
    return this.booksService.create(book);
  }
which will result in
and by defining also a return type we can ensure that the API user knows the structure of their response
 @ApiExtraModels(Book)
 @ApiOkResponse({
   description: 'The list of all books',
   schema: {
     type: 'object',
     properties: {
       total: {
         type: 'number',
         example: 1,
       },
       page: {
         type: 'number',
         example: 1,
       },
       limit: {
         type: 'number',
         example: 10,
       },
       data: {
         type: 'array',
         items: {
           type: 'object',
           $ref: getSchemaPath(Book),
         },
       },
     },
   },
 })
 @ApiNotFoundResponse({
   description: 'No books found',
 })
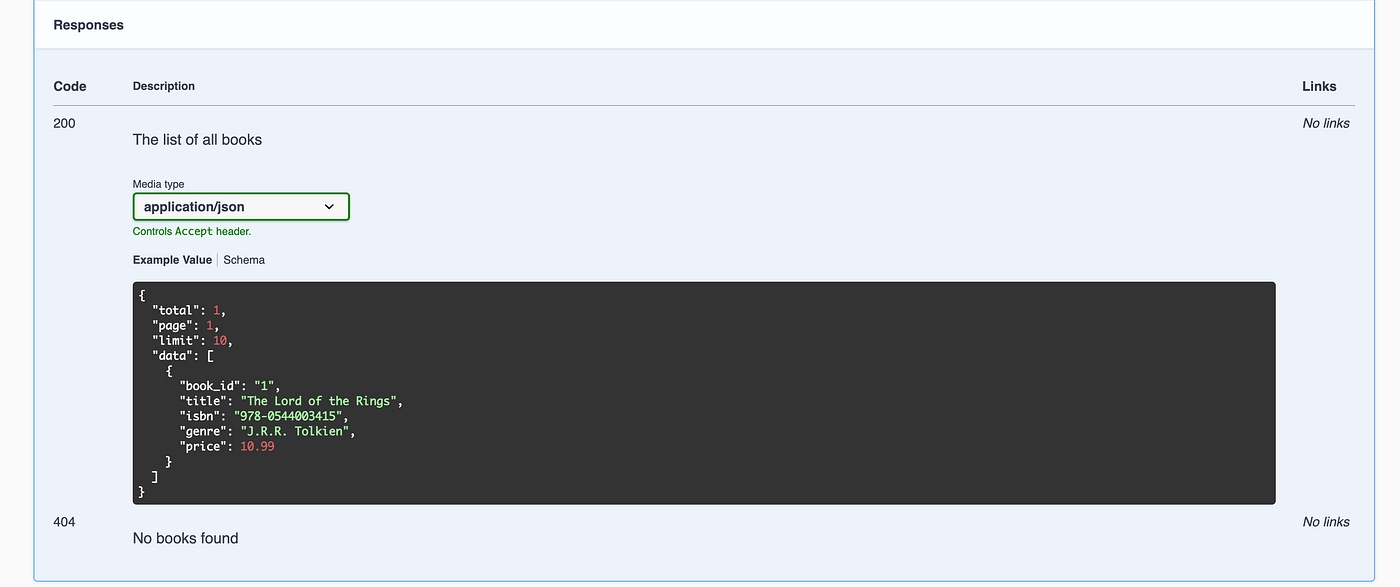
This looks so much clearer!
Conclusion
Let’s face it, creating the perfect documentation is not the most compelling thing a developer wants to do. But as we can see, this can make a clear difference for those who later will use the software and will be easily able to understand the logic behind it

comments powered by Disqus